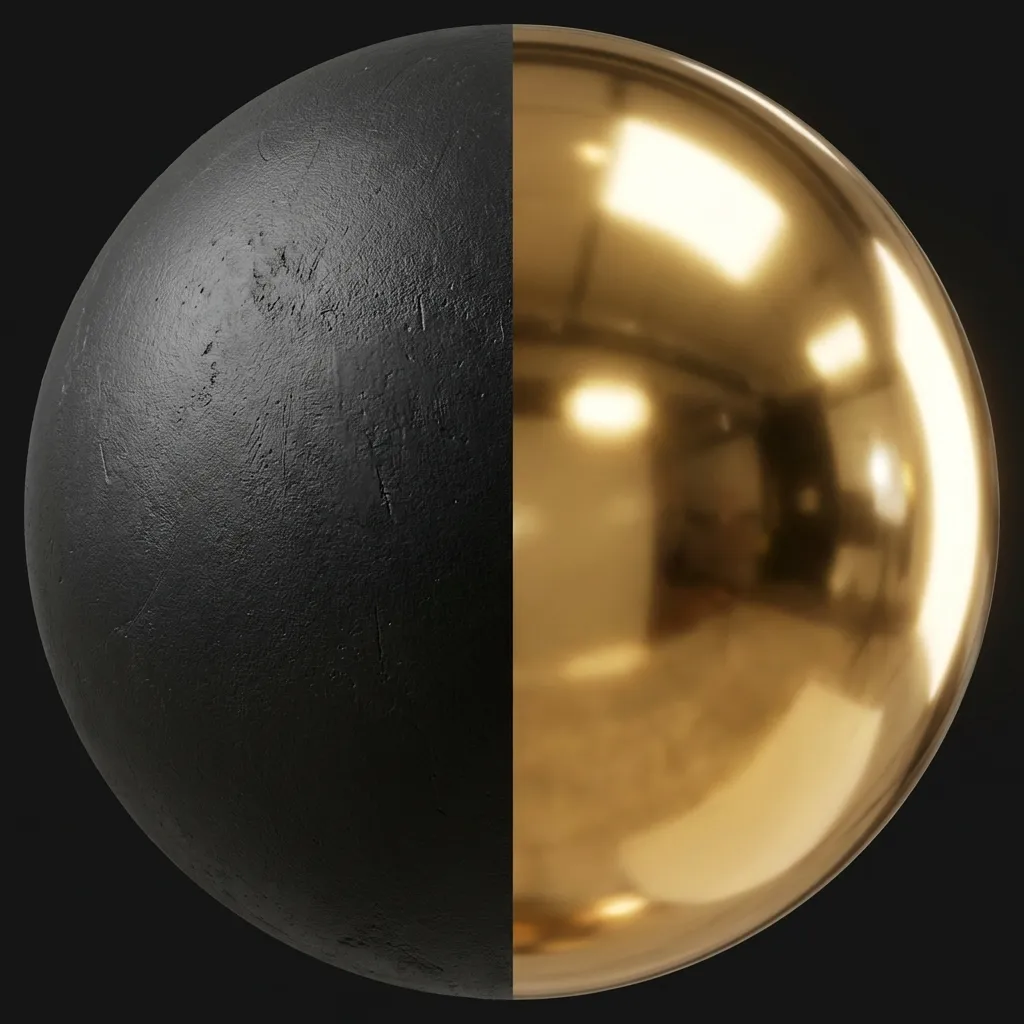
Visualizing Roughness: Left side is High Roughness (0.9), Right side is Low Roughness (0.1).
How shiny or matte an object appears is controlled by its Roughness Map (also called a Gloss Map in legacy workflows). Getting roughness right is arguably the most impactful step in achieving photorealistic PBR materials. A poorly tuned roughness map makes everything look like cheap plastic, while a well-crafted one makes surfaces feel authentically worn, weathered, and alive.
What Does a Roughness Map Do?
No real-world surface is perfectly smooth — even polished mirrors have micro-scratches at the microscopic level. A roughness map tells the rendering engine how to scatter reflected light at each pixel, simulating the microscale surface irregularities that are far too small to model with geometry or even normal maps.
The roughness map is a grayscale image where each pixel’s brightness value (from 0.0 to 1.0) controls the spread angle of specular reflections:
- Black (0.0): Perfectly smooth. Incoming light bounces off in a single, coherent direction. Result: Sharp, mirror-like reflections with tight, bright specular highlights. Think polished chrome, still water, or freshly waxed car paint.
- White (1.0): Extremely rough. Incoming light scatters in all directions equally. Result: Completely matte, diffuse appearance with no visible reflections or specular highlights. Think dry concrete, unfinished wood, or chalk dust.
- Gray values (0.3–0.7): The vast middle ground where most real-world materials live. Slightly worn metal, brushed aluminum, leather, skin, painted walls — all occupy this range with varying amounts of micro-detail.
Why Roughness Variation Matters
The single most important principle for realistic roughness maps is variation. In the real world, no surface has perfectly uniform roughness. A kitchen countertop has fingerprints, water stains, and smudge marks that locally reduce roughness. A metal handrail has polished contact areas where hands grip it and corroded patches where moisture collects. A wooden floor has scuff marks from shoes and smooth patches where wax pooled.
Pro tip: The best roughness maps include fingerprints, scuffs, water stains, wear patterns, and edge wear — all the imperfections that break up uniform reflections. These details are what make the difference between “CGI-looking” and “photorealistic.”
Roughness vs. Glossiness: Understanding the Two Workflows
You will encounter textures labeled either “Roughness” or “Glossiness” depending on which PBR workflow convention they were created for. They control the exact same physical property — microsurface scattering — but their values are mathematically inverted:
Roughness = 1.0 − Glossiness
A pixel with Roughness value 0.8 is equivalent to a pixel with Glossiness value 0.2. They are simply two ways of expressing the same information.
Roughness Workflow (Modern Standard)
The Metallic/Roughness workflow is the current industry standard adopted by the majority of modern engines and authoring tools:
- Unreal Engine 5 — uses Roughness natively in all material graphs.
- Unity HDRP & URP — expects Roughness in the Standard Lit shader.
- Blender (Principled BSDF) — uses a Roughness input by default.
- Substance 3D Painter/Designer — default Metallic/Roughness template.
- Godot Engine — uses Roughness in its Standard Material.
In this workflow, white = rough/matte and black = smooth/shiny.
Glossiness Workflow (Legacy / Specular)
The Specular/Glossiness workflow was dominant in earlier generations of rendering technology:
- Older V-Ray versions — used Glossiness maps extensively.
- Legacy Unity (Built-in Render Pipeline) — the Standard Shader accepts Glossiness with the Specular setup.
- Marmoset Toolbag — supports both but historically used Glossiness.
- Some architectural visualization plugins — still prefer Glossiness maps.
In this workflow, the value interpretation is flipped: white = smooth/shiny and black = rough/matte.
How to Convert Between Roughness and Glossiness
If you download a texture package that includes a Gloss map but your engine expects Roughness (or vice versa), you do not need to re-generate the texture from scratch. Because they are mathematical inverses, converting between them is trivial:
Method 1: Image Editor
In Photoshop or GIMP, open the map and press Ctrl + I (or Cmd + I on Mac) to invert all color values. Save the result as your converted map.
Method 2: Shader Node
In your material graph (Blender, Unity, Unreal), insert a “One Minus” node (or Invert node) between the texture sample and the material input. This performs the 1.0 - value conversion in real-time without modifying the source file.
Method 3: Batch Conversion
For large texture libraries, you can use command-line tools like ImageMagick: magick convert gloss.png -negate roughness.png to batch-invert entire folders of maps.
How Roughness Interacts with Other PBR Maps
Roughness does not exist in isolation — it interacts with every other map in the PBR material stack:
- Normal Maps: Roughness determines how the micro-detail captured by normal maps is perceived. High roughness softens the visual impact of normal map detail, while low roughness makes every tiny bump cast sharp specular highlights.
- Metallic Maps: Metals with low roughness produce vivid, colorful reflections (think gold, copper). Metals with high roughness appear dull and tarnished.
- Ambient Occlusion (AO) Maps: AO darkens crevices. When combined with moderate roughness, it creates the impression of accumulated grime in recessed areas.
Generate Roughness Maps Online
Our Free Normal Map Online Generator automatically produces roughness maps alongside normal maps, height maps, metallic maps, and AO maps — all from a single source texture. Upload your image, adjust the roughness intensity slider to match your desired material feel, and download the complete PBR texture set.
Related guides: Learn about the fundamentals in What is a Normal Map?, understand depth textures in Height & Displacement Maps, or explore metal rendering in Metallic PBR Workflow.